
Rope Face Pulls: 6 Mistakes That Kill Your Rear Delts
MyFitnessCoach
April 10, 2025
A rope face pull is a cable exercise where you pull a rope attachment toward your face while spreading your hands apart, training the rear deltoids, the rotator cuff, and the upper-back muscles that pull your shoulder blades together. It's one of the most recommended movements for shoulder health and posture and one of the most commonly performed wrong.
The problem is rarely the exercise. It's that people treat it like a row and pull with their arms, which sends the work to the biceps and upper traps instead of the rear delts and rotator cuff. This guide covers how to set it up, what it actually trains, where your elbows belong, and how to fix it when you feel it everywhere except where you're supposed to.

Table of Contents
Subscribe to our newslettter
What Is a Rope Face Pull?
A rope face pull is a cable-machine exercise performed with a rope attachment set at roughly face or upper-chest height. You pull the rope toward your face while pulling the two ends apart, so your hands finish beside your ears with your knuckles pointing behind you. The movement combines three actions at once: horizontal abduction (drawing the upper arms out and back), external rotation (rotating the forearms up and back), and scapular retraction (squeezing the shoulder blades together).
That combination is what makes it a shoulder-health staple rather than just another back exercise.
Muscles Worked in Rope Face Pulls
Primary movers
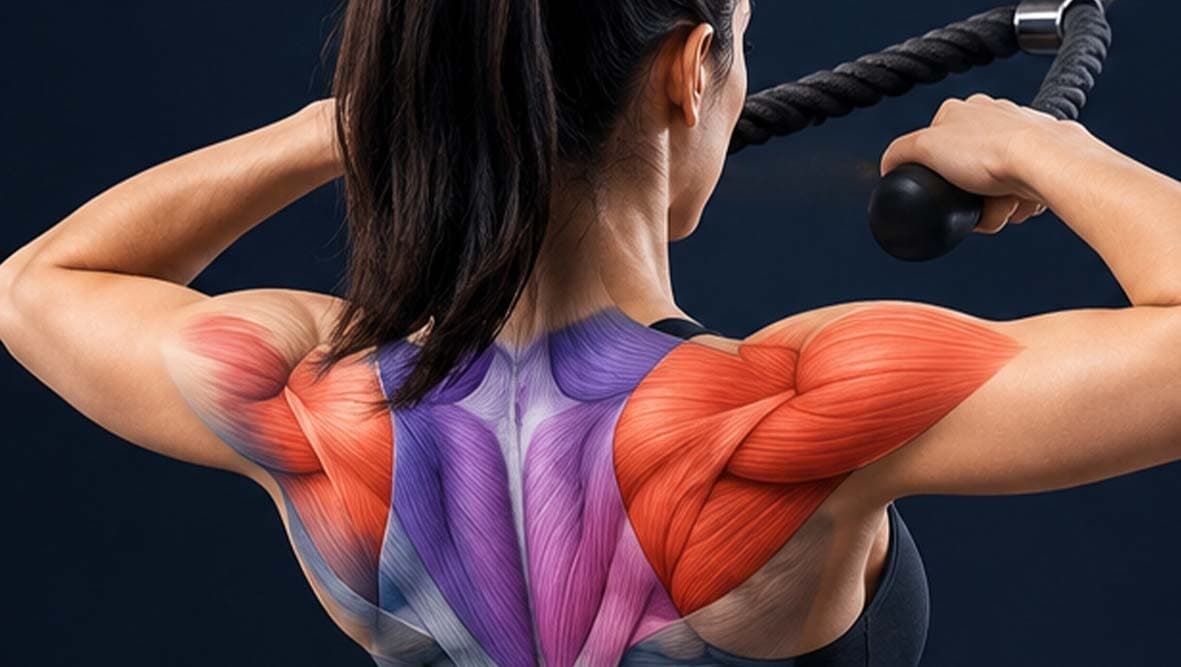
Rear deltoids (posterior deltoid). The main target. They drive the horizontal abduction pulling your upper arms out and back away from the midline.
Infraspinatus and teres minor. Two of the four rotator cuff muscles. They produce the external rotation at the end of the movement, when your knuckles rotate up and back. Most rear-delt exercises don't train these; the face pull does, which is a large part of its value for shoulder health.
Assisting muscles
Middle and lower trapezius. Retract and depress the shoulder blades.
Rhomboids. Draw the shoulder blades together.
Biceps and forearms. Flex the elbows. They're meant to assist when they lead, the exercise stops working (see troubleshooting).
The face pull is essentially a horizontal-abduction-with-external-rotation pattern. Fine-wire EMG research on shoulder exercises found that horizontal abduction combined with external rotation is one of the strongest ways to recruit the posterior deltoid and posterior rotator cuff at the same time which is exactly the pattern a correctly performed face pull trains. That's the mechanical reason it earns its reputation, rather than just tradition.
Why a Rope — Not a Bar?
Most guides say "the rope allows a better range of motion" and leave it there. That's incomplete, and the real reason matters for how you do the exercise.
A straight bar locks your hands a fixed distance apart and keeps your forearms pronated (palms down) the whole time. You can pull it to your face, but you can't rotate. A rope lets your hands travel independently, so at the top you can pull the two ends apart and rotate your knuckles up and back. That added movement is external rotation and external rotation is what brings the rotator cuff (infraspinatus and teres minor) into the exercise.
So the rope isn't just "more range." It changes what the exercise trains. Without the ability to separate your hands and rotate, a face pull is mostly a rear-delt and trap movement. With it, you also train the posterior cuff which is the specific reason face pulls are prescribed for shoulder health rather than a straight-bar high row.
If your gym only has a bar, a face pull still works the rear delts. You just lose the rotator-cuff benefit that makes the rope version worth singling out.
How to Do Rope Face Pulls (Step by Step)
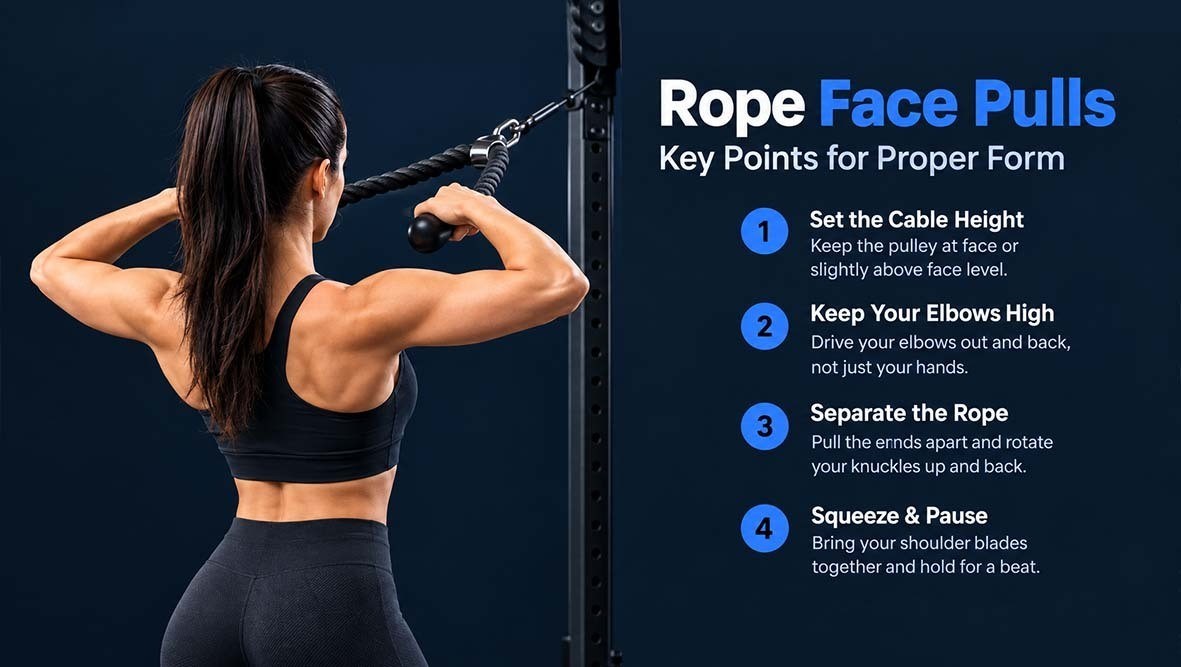
- Set the pulley to face height or slightly above roughly eye to forehead level. Attach a rope.
- Grip the ends with a neutral grip, thumbs pointing back toward you, palms facing each other.
- Step back to create tension and take a staggered or shoulder-width stance. Brace your core so your torso doesn't drift backward.
- Start with arms extended and shoulder blades relaxed forward, letting the weight gently stretch them.
- Initiate by pulling your shoulder blades together, then drive your elbows out and back, think "elbows toward the walls behind you," not "hands to my face."
- Spread the rope apart as you pull, so your hands separate and finish beside your ears.
- Rotate at the top so your knuckles point up and back and your palms face forward. This is the external-rotation piece most people skip.
- Pause for a beat at the fully retracted, externally rotated position.
- Return slowly two to three seconds until your arms are extended and shoulder blades relaxed forward again.
- Reps: 12–20 per set suits this movement. It responds better to controlled moderate loads and higher reps than to heavy weight.
Breathing: exhale as you pull, inhale on the return.
Where Should Your Elbows Actually Be?
This is the most inconsistent cue in every face pull guide. Some say keep elbows high, some say shoulder level, some say flared. Here's how to resolve it without overthinking.
Your elbows should travel at roughly the same height as the rope and your shoulders not drooping down toward your hips, not shrugged up toward your ears. If the pulley is at face height, your elbows naturally track at about shoulder height as you pull. That keeps the line of pull horizontal, which is what loads the rear delts and posterior cuff.
The two failure modes explain why the cue varies:
- Elbows too low (dropping toward your ribs) turns the movement into a high row with more lats and biceps, less rear delt.
- Elbows driven too high with a shrug shifts the work to the upper traps.
The "high elbows" advice you'll see is really trying to stop the first mistake (low elbows), and the "don't go too high" advice is trying to stop the second. Both are correct warnings; neither is the whole picture. The simplest reliable cue: keep your elbows level with the cable and lead with them, not your hands.
Adjusting pulley height slightly changes the emphasis; a higher anchor with elbows tracking upward biases the movement toward the lateral/upper region, a face-height anchor keeps it on the rear delts and cuff. Neither is wrong; pick based on what you're training.
Common Mistakes and How to Fix Them
Using too much weight. The most common problem. Heavy loads force you to lean back and heave with momentum, and the small target muscles get bypassed entirely. Fix: drop the weight until you can pause at the top with control. This is a high-rep, moderate-load movement.
Pulling with your hands instead of your elbows. If the movement starts at your hands, your biceps lead. Fix: think "drive the elbows out and back." The hands just hold the rope.
Skipping the rotation. Pulling the rope to your face without rotating your knuckles up and back leaves out the external rotation and the rotator cuff works with it. Fix: finish every rep with knuckles pointing up and back, palms forward.
Shrugging. Shoulders rising toward the ears means the upper traps have taken over. Fix: keep a long neck; think "shoulders down" as you pull.
Standing too close. No tension at the start means no work at the most stretched position. Fix: step back until the weight stack is lifted and the cable is taut with your arms extended.
Leaning back. Turning it into a seated-row lean recruits the lats and lower back. Fix: brace your core and keep your torso vertical.
Troubleshooting: Why You Feel It in the Wrong Place
If your face pulls aren't working, one of these is almost always why.
| Problem | Likely Cause | What to Try |
| You feel it mostly in your biceps | You're pulling with your hands and flexing your elbows to move the weight | Lead with the elbows driving out and back. Drop the weight 30% and do a few sets thinking only about the elbows. |
| You feel it in your upper traps, not rear delts | Shrugging, or the pulley/elbows are too high | Lower the pulley to face height, keep shoulders down, and stop the elbows at shoulder height. |
| You feel it in your lats | Elbows dropping toward your ribs, turning it into a high row | Raise your elbow path so it's level with the cable, not angled downward. |
| No rear-delt sensation at all | You're pulling to your face but not spreading the rope or rotating | Exaggerate separating the hands and rotating the knuckles up and back at the top. Pause there. |
| Grip/forearms fatigue first | Load too heavy, or over-gripping the rope | Lighten the load. Hold the rope more in the fingers than a death grip; the hands only guide. |
| It feels like a lower-back exercise | Leaning back and using momentum | Brace your core, keep your torso vertical, reduce the weight. |
If leading with the elbows still doesn't create a rear-delt connection, spend a few weeks on lighter rear delt raises to build the mind-muscle connection with an isolated movement, then return to face pulls.
Sets, Reps, and Where It Fits
Face pulls are an accessory and prehab movement, not a heavy strength lift. Program them accordingly.
| Use case | Sets × Reps | Placement |
| Warm-up before pressing | 2 × 15–20 | Start of an upper-body or push session |
| Rear-delt / posture accessory | 3 × 12–20 | After main back or shoulder work |
| Shoulder-health / balance focus | 3–4 × 15–20 | 2–3× per week, any upper-body day |
Rest 30–60 seconds. Because the loads are light and the muscles small, face pulls recover quickly and can be trained frequently several times a week is fine and often beneficial for people who do a lot of pressing.
Progression: add reps within the range first (work from 12 up to 20), then make the smallest possible weight increase and drop back to the low end of the range. Don't chase heavy loads here — past a certain point, added weight just reintroduces momentum and takes the work off the target muscles. Quality of contraction matters more on this movement than load.
Variations
Band face pulls. Anchor a resistance band at face height. The best option for home or travel and a good warm-up, though you can't load it as precisely as a cable.
Seated rope face pulls. Sitting removes the ability to lean and cheat with momentum, which makes them stricter useful if you keep drifting backward.
Single-arm face pulls. One handle at a time. Good for addressing a side-to-side difference and for feeling the rotation more clearly.
High-to-low or low-to-high angles. Changing the pulley height shifts emphasis slightly around the rear and upper shoulder. Useful for variety, not something to overthink.
For balanced shoulder development, pair face pulls with a pressing movement and a dedicated rear-delt isolation like rear delt raises; the seated lateral raise covers the side delt.
The Bottom Line
Rope face pulls train the back of your shoulders and your rotator cuff in one clean movement but only if you let the rope do its job. Spread the ends, rotate your knuckles up and back, and lead with your elbows rather than your hands. Keep the weight light enough that you can pause at the top without heaving.
Done that way, it's one of the best low-cost investments you can make in shoulder health and posture, especially if most of your training is pressing.
If you want structured shoulder and posture routines that program movements like this in the right order and volume, MyFitnessCoach builds them around your goals and tracks your progress over time.
This article is for informational purposes only and is not a substitute for professional medical advice, diagnosis, or treatment. If you have a shoulder injury or persistent pain, consult a qualified healthcare provider before starting new exercises.
Frequently Asked Questions
Similar Articles
Stay informed with these similar articles.
MyFitnessCoach
May 9, 2025
Why Kneecaps Sweat? 5 Surprising Causes & Proven Fixes
Ever noticed your knees getting sweaty for no reason? You're not alone. Sweaty kneecaps might seem odd, but they're more common than you think.
MyFitnessCoach
March 6, 2025
Arm Swing Exercise: Effective Way to Boost Your Fitness
When it comes to fitness, we often think of intense workouts, heavy lifting, or long runs. But what if I told you that a simple exercise like arm swings could be just as effective in improving your overall fitness? Arm swing exercises are easy to do, require no equipment, and can be done anywhere. Whether you're a beginner or a fitness enthusiast, arm swings can help you improve flexibility, strength, and even cardiovascular health. In this article, we’ll explore the benefits of arm swing exercises, how to do them correctly, and how you can incorporate them into your fitness routine using the MyFitnessCoach app.
MyFitnessCoach
February 24, 2025
Best Deodorant for Athletes: Stay Fresh During Your Workouts
When you're an athlete or someone who loves to stay active, staying fresh and odor-free is a top priority. Whether you're hitting the gym, running a marathon, or sweating it out during a high-intensity workout, the right deodorant can make all the difference. But with so many options available, how do you choose the best deodorant for athletes? In this article, we’ll break down everything you need to know about finding the perfect deodorant to keep you feeling confident and fresh, no matter how intense your workout gets. Plus, we’ll show you how the MyFitnessCoach app can help you stay on top of your fitness game.